sett benchmarks
Setting-up your system to run the sett benchmarks
If not already done, install sett following these instructions.
Download the benchmark script file.
If needed, install the required dependencies - see Requirements.
Warning
If you are installing the benchmark script as a system administrator, please be aware that it can potentially be exploited by users to execute any shell command on a system. Therefore the benchmark script should only be granted permission to run with regular user permissions, i.e. never give SUID permissions to the script.
Requirements
Python >= 3.8
Podman if the
sftp_serverargument value is set topodman.Docker if the
sftp_serverargument value is set todocker.pigzif using external compression as part of the benchmarks (seecompression_cmdargument in the config file).pigzwill be needed to run the most of the presets.WARNING: the benchmarks currently only work on Linux and MacOS X systems.
Running the sett benchmarks
The sett benchmarks are run by executing the script run_benchmarks.py as
illustrated below.
The benchmarks can be run with a number of different factor levels (e.g. data size, data type, sett commands to run, etc.) and other options, all of which are described in the Benchmark parameters section below.
While all benchmark parameters have a default value, some might need to be changed to match your local system configuration. You should pay particular attention to the values of the following parameters:
sftp_server: defaults topodman, but you might need to change it (e.g. todockerif you are using docker to run containers).
root_dir: defaults to the current working directory.
To modify a parameter from its default, its value must be set via the following config file:
Linux:
~/.config/sett/benchmark_config.jsonWindows:
C:\Users\%username%\AppData\Roaming\sett\benchmark_config.jsonMac OS:
~/.config/sett/benchmark_config.json
To run the benchmarks, execute the run_benchmarks.py file as shown in these
examples:
./run_benchmarks.py                     # run the benchmarks.
./run_benchmarks.py --dry-run           # run the script in "dry-run" mode.
./run_benchmarks.py -d --preset=full    # dry-run mode with "full" preset.
./run_benchmarks.py --preset=quick      # run the benchmarks with "quick" preset.
The benchmark outputs are saved in a tab-delimited file named
benchmark_results.tsv (or benchmark_results_<preset>.tsv if running a
preset), which is saved in the directory specified through the root_dir
parameter.
Outside of the benchmark parameters passed via the config file, the benchmark script itself takes 2 optional arguments:
--dry-run / -d: dry-run mode. Displays the parameter combinations that to be run without running the actual benchmarks.
--preset / -p: run the benchmarks with a “preset” that overrides both the default and the user config file values. Three presets are available:"quick","short"and"full"-"q","s"and"f"can be used as abbreviations.Here is a summary of each preset - to see the detailed values associated with each preset, run it in
--dry-runmode:
quick: preset to do a quick check of whether the benchmark script is working on your machine. It runs only small input data sizes and takes a few minutes to complete.
short: preset that runs only a limited number of parameter combination, but with input data sizes up to 100 GB. Please note that running this preset will require ~200 GB of free disk space on your machine. The total runtime for this preset can be up to 30 hours.
full: preset that runs the full combination of possible parameter values for input data up to 1 GB. Running this preset will require ~ 10 GB of free disk space on your machine. The total runtime for this preset can be up to 4 days.
Benchmark results plotting
Automated plotting of benchmark results is possible for a specific set of presets using the plot_benchmarks.py script.
Please note that the plot_benchmarks.py script only works to plot the
results from the short and full presets. By default the input files are
expected to be named benchmark_results_short.tsv and
benchmark_results_full.tsv, but custom names can be passed via the -s
and -f arguments. Run plot_benchmarks.py --help for more details.
If an input file is missing, the plots to be drawn for that file will simply be skipped, but the script will still run.
The set of commands to plot benchmark results is thus the following:
./run_benchmarks.py --preset=short
./run_benchmarks.py --preset=full
./plot_benchmarks.py
Benchmark parameters
Benchmark factor levels
The following parameters accept one or more values (in a list format) that are used as factor levels in the benchmarking. The benchmarks will be carried-out across all combinations of the different parameter values.
- data_size:
Total size of data in megabytes [MB] to be used as input for the sett “encrypt” workflow. The minimum value is 1 MB and the maximum value depends on how much space is available on the machine running the benchmarks. Please note that the amount of available disk space must be at least twice the maximum value.
Example:
"data_size": [100, 200, 500, 1000, 5000, 10000, 20000, 100000]- file_size_type:
The file size composition of the data used for the benchmarking. Possible values are:
"small": the data to encrypt with sett consists exclusively of a combination of small (1 MB) files."large": the data to encrypt with sett consists of a combination of large files. The size of the files depends on the total data size of a given benchmark run."mixed": the data to encrypt with sett consists of a combination of small (1 MB) and large files.
Example:
"file_size_type": ["small", "large", "mixed"]- file_data_type:
The content of the files to encrypt with sett during the benchmarks. Possible values are:
"text": use random FASTA-format like files as input."binary": use random binary files as input.
Example:
"file_data_type": ["text", "binary"]- sett_cmds:
The sett commands to benchmark. Possible choices are
"encrypt","decrypt"and"transfer". The"encrypt"command is mandatory and will automatically be added if missing.Example:
"sett_cmds": ["encrypt", "decrypt", "transfer"]- compression_levels:
Levels of gzip/bzip2 data compression used in the sett “encrypt” workflow (or during external compression). Values must be in the range 0 (no compression) to 9 (highest compression).
Example:
"compression_levels": [0, 1, 2, 3, 4, 5, 6, 7, 8, 9]- compression_cmd:
Compression method to use when packaging data. Possible values are:
"sett": use sett native compression."pigz": use a combination oftarandpigzto compress data. This compression method supports multi-threading."7zip": not supported yet.
Example:
"compression_cmd": ["sett", "pigz"]- compression_cpu:
Number of CPUs to be used for with the compression command(s). This parameter is only used when external compression is performed, since sett itself always uses a single CPU for data compression.
Default value: dependent on number of CPUs available on host machine.
Example:
"compression_cpu": [1, 4, 8, 16]- replicates:
Number of replicates to run for each benchmark combination.
Default value:
5Example:
"replicates": 3
Input/Output file locations
- root_dir:
Root working directory. Base working directory to be used for the benchmarking. All input and outputs will be written exclusively within this directory.
Default value:
current working directory/sett_benchmarksExample:
"root_dir": "~/sett_benchmarks"- sett_exec:
Name of the sett executable to use during benchmarks. If the executable is not part of the default search PATH, the full path to the executable must be given.
Default value: the default
settexecutable present in the search PATH.Example:
"sett_exec": ~/.local/bin/sett
SFTP parameters
- sftp_server:
SFTP server to use when running the sett “transfer” command. Possible values are:
Default value:
"podman"Example:
"sftp_server": "local"- sftp_username:
SFTP authentication user name. User name to be used when connecting to the SFTP server. Only used when SFTP server is set to
"local".Default value: the $USER environmental variable.
Example:
"sftp_username": "alice"- sftp_ssh_key:
Path and name of SSH private key to be used for SFTP authentication. This argument is only needed when
sftp_serveris set tolocal.Default value:
~/.ssh/id_ed25519or~/.ssh/id_rsa(whichever is present).Example:
"sftp_ssh_key": "~/tests/tests_ssh_key_rsa"- sftp_ask_for_password:
This parameter is only relevant when
sftp_serveris set to"local". Iftrue(the default), you will be asked to enter the password for the private SSH key used to connect to the local host. If your SSH key is does not have a password and you do not wish to be asked to enter an empty password each time, change the parameter value tofalse.Default value:
trueExample:
"sftp_ask_for_password": false(boolean values are unquoted and lower case)- sftp_destination_dir:
Destination directory for SFTP data transfer. The path on the SFTP server to where transferred data should get uploaded.
Default value:
"/upload"Example:
"sftp_destination_dir": "/upload"
Misc parameters
- show_stdout:
If
"True", the standard output of the sett commands being run during the benchmarks is printed to the terminal. Setting the value to"false"(the default) gives a cleaner output but individual runs of sett commands cannot be followed as they progress.Default value:
falseExample:
"show_stdout": true(boolean values are unquoted and lower case)
Benchmark results and sett performance
Important
All results presented here were obtained by using input data in the form of text files containing simulated genomic data in FASTA format. Data compression efficiency, both in the amount of compression and the time needed for compression, can significantly vary depending on the type of input data, and therefore the sett performance values illustrated in this section are not representative of all data types.
Overall sett performance
This section shows the time needed for the different sett tasks - data packaging (compression + encryption), transfer and decryption - as a function of input data size. If your input data is roughly similar to genomic FASTA files (or has the same compression behavior), then the graph below can be used to estimate how much time the different sett tasks will take.
Input data sizes up to 100 GB were tested, and, as can be seen, the time to complete the different tasks scales linearly with input data size. For data packaging (compression + encryption), sett is able to process data at a speed of about 25 MB/second (1.5 GB/minute) (CPU 2.2 GHz base and 3 GHz turbo).
Higher data compression speeds can be achieved by using an external data
compression command that supports multi-threading (in our benchmark
multi-threaded compression is done with gzip + pigz), and using sett
only for data encryption and transfer. This can save time when processing large
amounts of data.
All values shown in the figure below are averages of 3 replicated runs. The variance between runs is not shown as it is small (smaller than the dot symbol used to represent a data point). The benchmark was run on an AWS EC2 t3a.large instance (4 vCPUs - AMD EPYC 7571 @ 2199.742 MHz, 16GB Memory, 500GB General Purpose SSD - gp2).
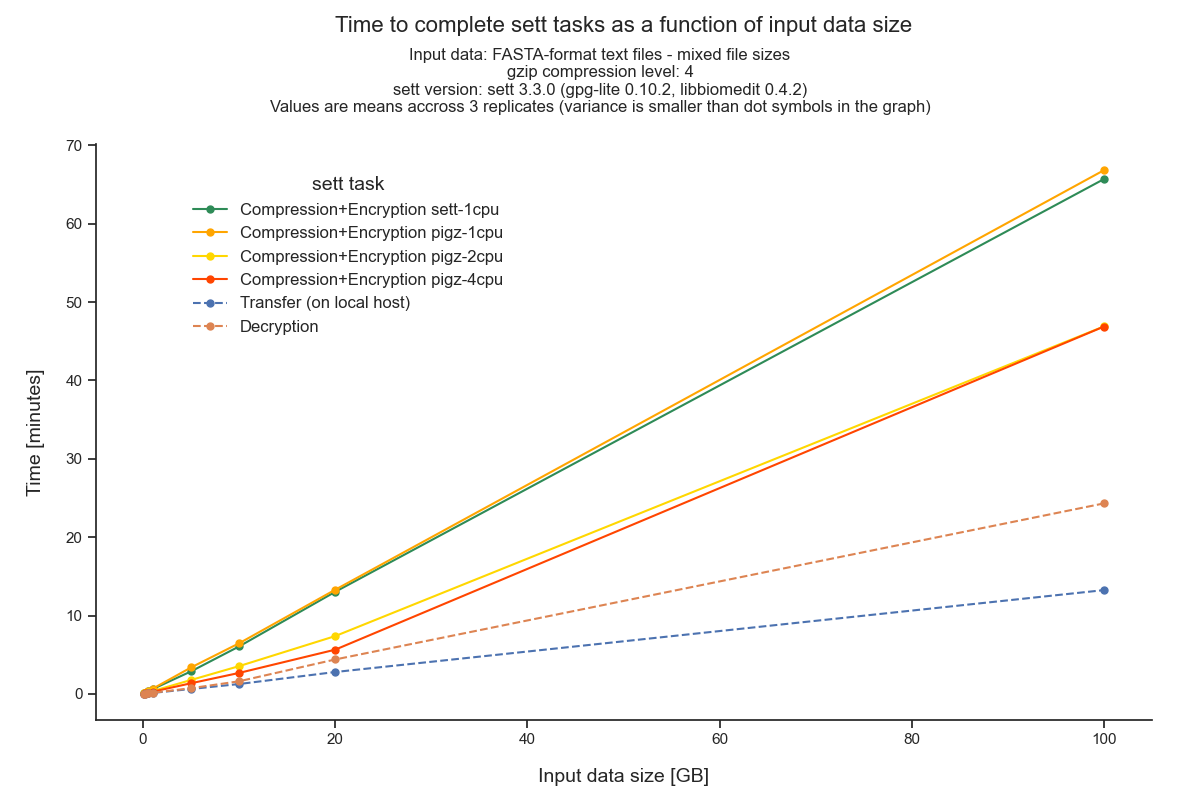
Important note regarding transfer speed interpretation:
Data transfer speeds via SFTP are highly dependent on the infrastructure connecting the data sender and recipients. In these benchmarks, the data recipient was an containerized (emulated) SFTP server located on the same machine that was sending the data. The transfer speeds showed here are therefore a best-case scenario.
Please keep in mind that the values on the x-axis are input data size, and not compressed data size. Since, for our input data, the data size is roughly reduced to a third of its initial size after sett packaging, the actual transfer speeds are ~3 times slower than what would be concluded by directly interpreting the figure’s values.
Compression level comparison
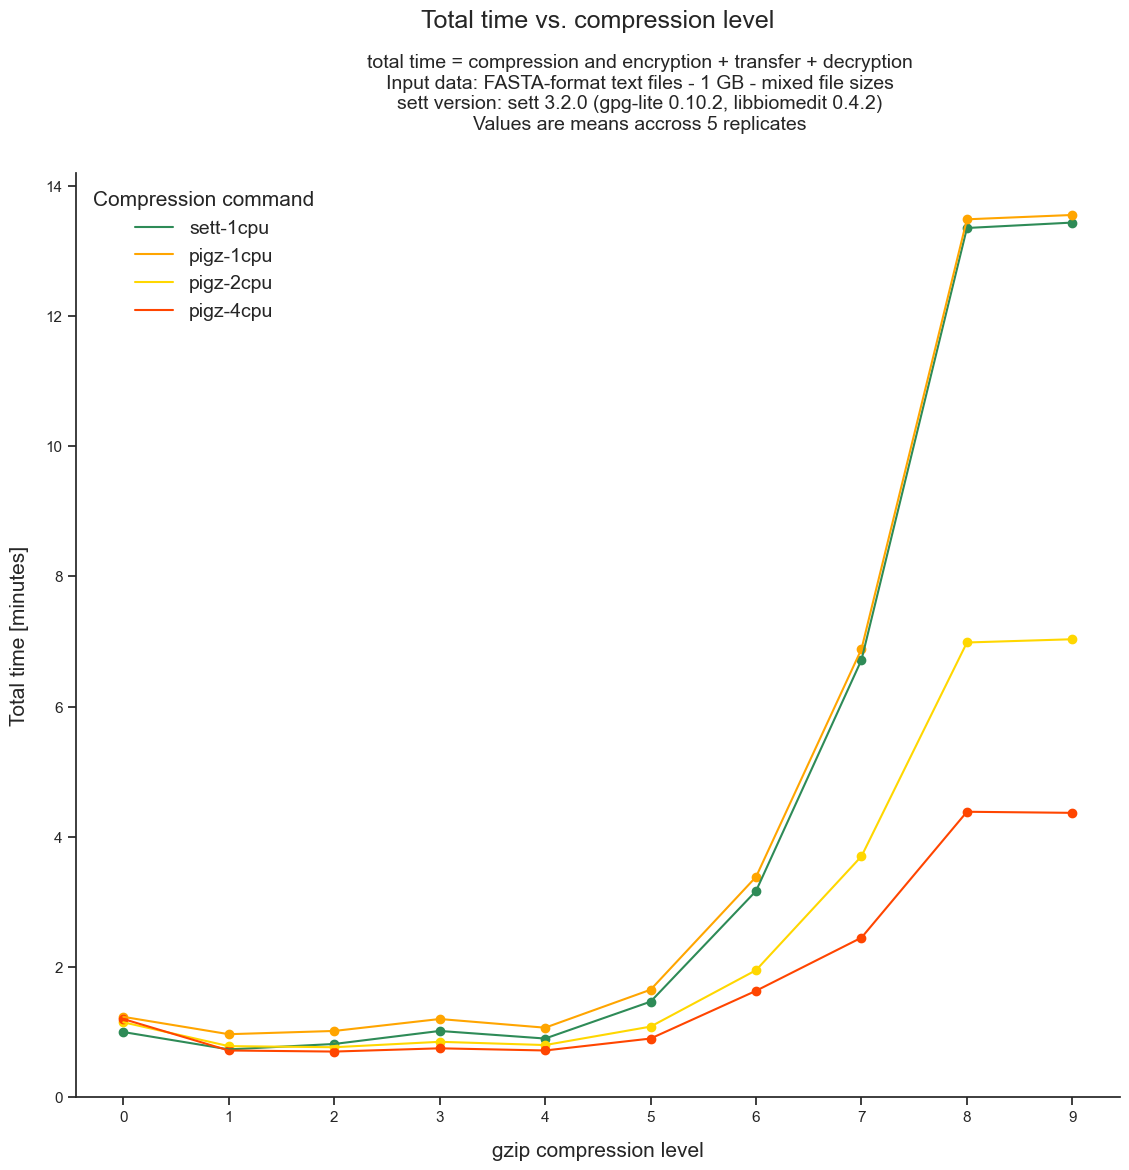
To perform data compression during data encryption, sett can use different levels of data compression. The data compression levels range between 0 (no compression) and 9 (maximum compression): higher compression levels produce more compressed data (i.e. smaller output file) but require higher CPU usage - and hence more time (given a fixed number of CPUs) - to do so.
This section of the benchmark results aims to illustrate which compression level offers the best trade-off. All benchmarks in this section were run on an AWS EC2 t3a.large instance (4 vCPUs - AMD EPYC 7571 @ 2199.742 MHz, 16GB Memory, 500GB General Purpose SSD - gp2).
Total data packaging, transfer and decryption time as a function of compression level
Using higher compression levels requires more time to package the data, but also results in smaller data packages, which are in turn faster to transfer. To identify the optimal compression level in this trade-off, we show here the total time needed to package, transfer and decrypt (end-to-end processing) a given size of input data as a function of compression level.
As illustrated in the figure below, the lowest end-to-end processing time is achieved when using a compression level of 1 or 2 with a single CPU and up to 5 when using 8 or 16 CPUs.
Data size reduction achieved by different compression levels
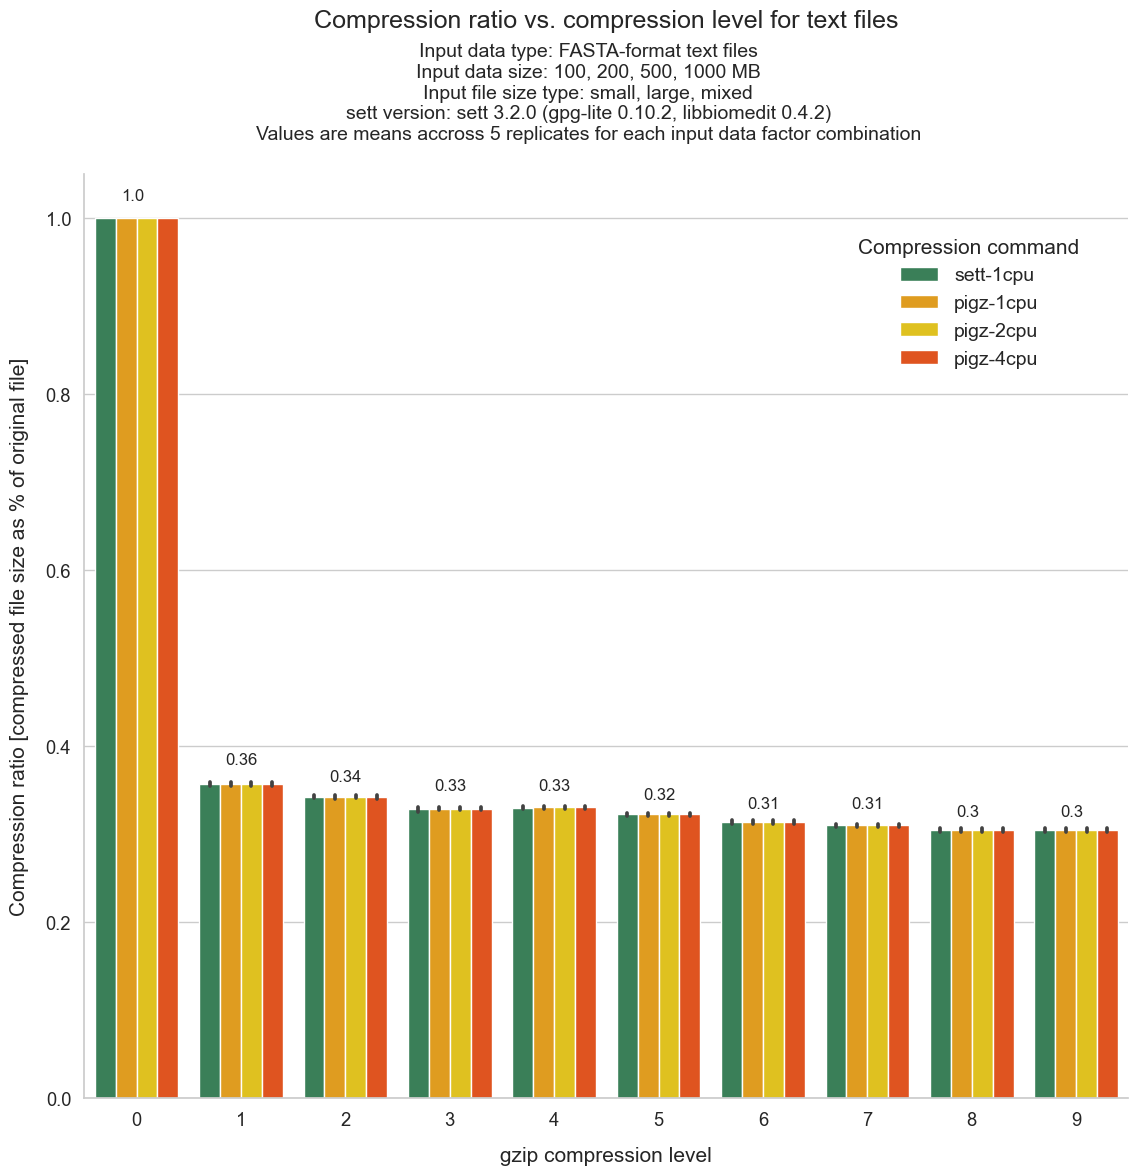
The graph below shows how much data compression can be expected from each compression level when packaging text files with genomic data. Values give the size of the sett output file as a fraction of the input data size. For instance, the compression level 5 has an average compression ratio of 0.32, meaning that the size of the sett output is 32% of the input data size. In comparison, the compression level 0 has, obviously, a compression ratio of 1.0 since there is no data compression at all - the sett output has thus the same size as the input data.
All shown values are averages obtained across different input data sizes (ranging from 100 MB to 1 GB) and file size compositions (i.e. lots of small files vs a few large files). The error bars indicate confidence intervals - which are very small as there is little variation of compression ratio between data sizes and file size compositions.
The graph also shows that, as expected, there are no differences in compression
using sett’s internal compression method - the
python tarfile module - or
external compression with gzip (multi-threaded or not).
Compression rate achieved by different compression levels
This graph shows the time efficiency of data compression (i.e. how much data reduction can be achieved per time unit) for the different compression levels. Lowering the compression level generally results in an increase in time efficiency - as increasing amounts of time must be spent to gain little additional compression. As can be seen, the most time efficient compression levels are levels 1 to 4.
Unsurprisingly, using multi-threaded compression (e.g. 8 or 16 CPUs) increases the rate of data compression, especially as compression level increases: the difference ratio between using 8 or 16 CPUs vs a single CPU is larger for higher compression levels.
